Optimising images for WordPress websites
We're going back to basics for this tutorial. Learn how to setup an image for display on your site. And why this is central to the performance of your WordPress website.

As web developers, we live inside code and photo editors all day. It’s easy to forget that not everyone knows how to prepare an image for display inside a WordPress website. In this article we’re going back to basics to help you understand how to setup an image for display on your site. And later on why this is integral to your site’s performance.
Let’s get started.
Choose the correct image format
When it comes to displaying images inside your WordPress site there are three formats to start with. Ensure that you’re using the correct format for the type of images you have.
Photographic images
Photographic images should almost always be setup as JPGs. This format is specifically designed to handle the high number of colours that a photo will have. Landscapes, images of people, pictures of your office, in fact almost anything that has come out of a camera should be setup as a JPG.
Mr Meerkat, at the top of this tutorial, it’s a JPG image. While it’s a large image (1200px X 600px) it’s only 33kb.
Icons and logos
Typically these are not photos, instead they’re created on a computer. These kind of images usually need to be sharp and clear. Or sometimes need to have transparency, all qualities that call for the PNG format.
This graphic that we’ve used on a previous blog post is a great example of a PNG image.
Images like this do not have very many colours in the them, PNG-8 images are limited to only 256 colours. This is more than enough for an image like the example. The PNG format means the resulting file can be very small. This example is only 49kb even though it’s relatively large in pixel dimensions.
Animations
These are commonly GIFs. One of the older image formats. It’s super-power is the ability to combine multiple frames together to make simple animations. Other icon style images can also be setup using the GIF format but if animation is not required, PNG is the best choice here.
What happens when you choose the wrong format?
Probably the most prevalent mistake new users make, when working with images, is uploading a photographic image in the PNG format. It makes for a very large file sized image. Sometimes as much as serval MB in size. And, is going to make the page load very slow.
JPG have a special compression ability that allow you to fool the eye into seeing more colours than actually are there. PNG does not have this same ability. A photograph in PNG format will contain a huge colour palette, which is responsible for the file size bloat.
More on image compression below.
Why size matters!
All the talk about optimising your images. Why bother? Here two really important reasons why it’s a good idea.
1) Page load speed
Or.. how long does it take for a user to load a page of content. Each webpage is made from a number of moving parts. HTML is the markup language that includes all of the text you have on the page. It also references all of the other assets you have, your images for example.
In order for the page to load and display on a user’s computer or phone, they have to transfer across their network connection, the HTML and all of the images. If you have large (file size) images it’s going to take longer for this to happen. Chances are, many visitors are not going to stick around if the page load speed is too slow. This is even more important for mobile users, typically the network speed is slower and so a page load can take even more time.
2) Impacts on your search engine visibility
Google has said for a while now, it’s actively places faster loading website above those that are slow in search results. Large images can have a real impact on how often your site is displayed on Google.
Check the file size of your images
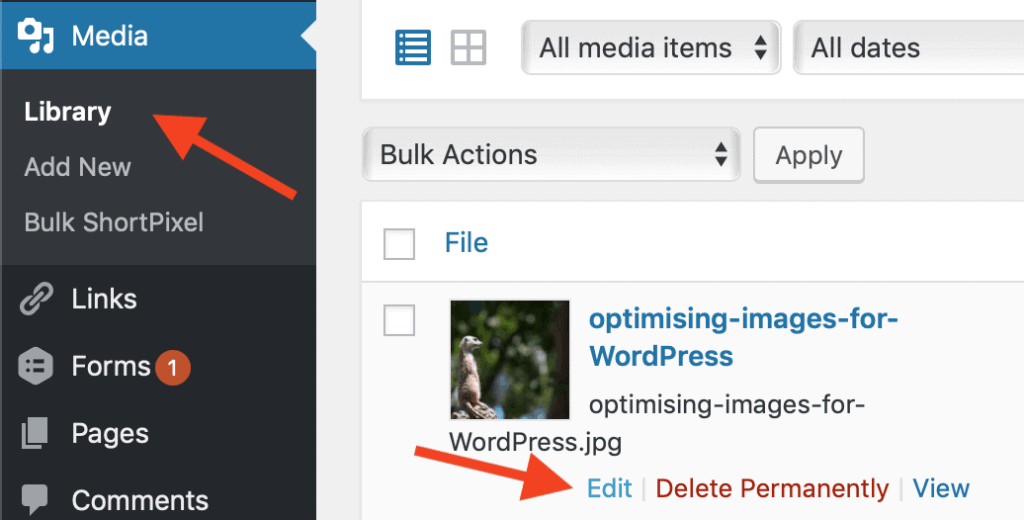
When you upload your image into WordPress, you can see how big they are from the Media Library interface. Begin in the media library, click edit on any of your images.
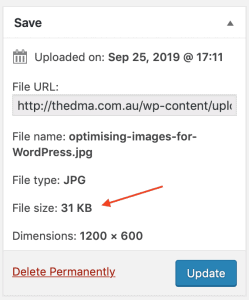
Then next to the image you can view the file size.
Compressing images
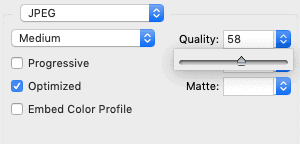
When you’re preparing images for your website you can compress them (making the file size smaller) before you upload them or after you upload them to WordPress. If you have a tool like Photoshop you can compress images using the ‘save for web‘ option. Using the quality slider shown here, you can view in real time what the image is going to look like, as well as the resulting file size.
If you don’t have tools on your computer to compress images you can opt to do it after you upload to WordPress. You’ll need access to a service like ShortPixel. This is a service that we use to help users manage images inside WordPress. It has to be installed into your site, once it’s available it can automatically compress images as you upload them. You can also retrospectively run the optimiser over parts or your whole media library to fix large images that have previously been uploaded.
We’ll be publishing a more detailed look at ShortPixel here on our site soon, keep a lookout for that.
Further Reading?
Keen to learn more about optimising your website for speed? Checkout our WordPress performance articles here. If you’re interested in SEO, we have a lot of content specifically for SEO within WordPress.
Reader Interactions