• Skip to primary navigation
  • Skip to main content
dma-logo-icon
  • WordPress development
  • Managed Hosting
  • Portfolio
  • Blog
  • Contact
  • WordPress development
  • Managed Hosting
  • Portfolio
  • Blog
  • Contact
Say hello
Hide Search

Archives for September 2019

WordPress and Google Analytics: getting started with goals

Peter Shilling · Sep 27, 2019 · Leave a Comment

When we launch new WordPress sites we have a checklist of go live procedures. Part of the process is to install and setup Google Analytics. Analytics is a brilliant tool, it’s been developed a lot by Google over the years to the point where it’s a complete tool for understanding visitors and the engagement on a WordPress site.

A quick aside… if you’re one of our Managed WordPress hosting customers we can now pull Google analytics data directly into your dashboard, talk to us to learn more about this.

On to the topic, Goals in Google analytics, are an easy way to get answers to some simple questions. How many people are filling in my contact form? How many people are visiting my page Meerkats? Are people looking at the blog content that I’m publish? You get the idea!

Google Analytics Goals

As well as showing you the basics like how many visitors you’ve received and which pages they visited there are some slightly more advanced things you can have analytics do for you.

A goal is just that. Something you’d like to achieve when a visitor is on your WordPress website. Probably one that resonates with just about every website is someone filling on the contact us form. Let’s use that as an example.

On our website we have a contact page where we receive enquiries about our services.

When people fill in the form we consider this a goal achieved, so when it’s all configured you get data like this.

goals

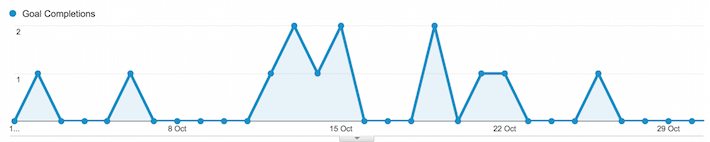
This is the month of October as you can see we can at least one enquiry every other day, some days we get a couple. Think about what you can do with this and what it means. Many folk think that website traffic is the utopia that they need to achieve, they spend lots on SEO work or perhaps Google advertising to get more traffic. That’s fine but if you don’t understand what your site does with all that traffic does it really make sense?

I know that in this month we received 1,184 visitors to our site. 13 of them completed the contact us form. I can work out the percentage of goals that were completed from the number of visitors. Obviously this does not include the people who visit the site and then call instead of filling in the form but there are ways to track that too. Perhaps that’s for another time.

With this logic, if I decided that I needed to increase the leads coming in I could think like this: I need 26 leads a month, I need to basically double the amount of traffic that I’m getting. Sure there is more variables in here, if I double the traffic and it’s not of the same quality etc.. it’s not going to work out but play along with me for a moment.

If you have goals setup when you set out to double your traffic you can monitor exactly what’s happening.

How to setup a goal

google analytics goals for wordpress
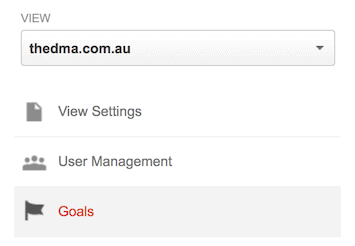
Login to your Google Analytics account, select the website property that you’re wanting to work on. Then you’ll see there are four menu items across the top. Home, reporting, customisation and admin. Select admin. From there you’ll see there’s an option for goals – check the screenshot here.

Now there are some fancy things you can do in here but let’s keep it simple to begin with.

We have a contact form that when submitted takes users to a special page that is /thank-you/ – a unique URL that you only get to when you fill in the form.

This is an easy way of creating a goal that can be centred around a specific URL.

google.analytics.goals.wordpress
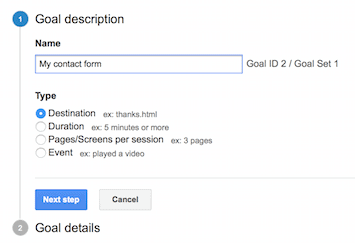
Select New Goal to begin.

This will step you through the setup. Give your goal a name, mine’s called “My contact form”. Choose Destination for this type of goal.

On the next screen you’re asked for the URL. You don’t need the domain name www.xyz.com part just the end section. In mine for example it is /thank-you/.

Finish by clicking Create Goal.

Your done. Google will now start to track the number of times that a visitor lands on that page meaning that they have filled in your form.

Where to find the report

Back in the reporting section of analytics you’ll see there is a number of menu items down the left side. Open the one that is conversions. From there you can begin to explore the data that Google is collecting around your newly setup goal.

What else can be setup as a goal

This is just a simple example, to get the idea of goals. There is a lot more that you can track. If you have an e-commerce WordPress website then you’d look to do something around the checkout. Think: every 1,000 users I receive, I make a sale. That statistic would be a great start point to learning how to sell more.

If you’re working a lot with social media, you may like to track a goal that shows you the increase in traffic that you’re getting from Twitter, or Facebook etc.. A great way to show you if all of your social media efforts are paying off.

Got a question?

I’m very happy to try and help, post a comment below if you’ve got a question – If I know the answer I’ll help you out with your goal tracking in Google Analytics.

Optimising images for WordPress websites

Peter Shilling · Sep 26, 2019 · Leave a Comment

As web developers, we live inside code and photo editors all day. It’s easy to forget that not everyone knows how to prepare an image for display inside a WordPress website. In this article we’re going back to basics to help you understand how to setup an image for display on your site. And later on why this is integral to your site’s performance.

Let’s get started.

Choose the correct image format

When it comes to displaying images inside your WordPress site there are three formats to start with. Ensure that you’re using the correct format for the type of images you have.

Photographic images

Photographic images should almost always be setup as JPGs. This format is specifically designed to handle the high number of colours that a photo will have. Landscapes, images of people, pictures of your office, in fact almost anything that has come out of a camera should be setup as a JPG.

Mr Meerkat, at the top of this tutorial, it’s a JPG image. While it’s a large image (1200px X 600px) it’s only 33kb.

Icons and logos

Typically these are not photos, instead they’re created on a computer. These kind of images usually need to be sharp and clear. Or sometimes need to have transparency, all qualities that call for the PNG format.

This graphic that we’ve used on a previous blog post is a great example of a PNG image.

Images like this do not have very many colours in the them, PNG-8 images are limited to only 256 colours. This is more than enough for an image like the example. The PNG format means the resulting file can be very small. This example is only 49kb even though it’s relatively large in pixel dimensions.

Animations

These are commonly GIFs. One of the older image formats. It’s super-power is the ability to combine multiple frames together to make simple animations. Other icon style images can also be setup using the GIF format but if animation is not required, PNG is the best choice here.

What happens when you choose the wrong format?

Probably the most prevalent mistake new users make, when working with images, is uploading a photographic image in the PNG format. It makes for a very large file sized image. Sometimes as much as serval MB in size. And, is going to make the page load very slow.

JPG have a special compression ability that allow you to fool the eye into seeing more colours than actually are there. PNG does not have this same ability. A photograph in PNG format will contain a huge colour palette, which is responsible for the file size bloat.

More on image compression below.

Why size matters!

All the talk about optimising your images. Why bother? Here two really important reasons why it’s a good idea.

1) Page load speed

Or.. how long does it take for a user to load a page of content. Each webpage is made from a number of moving parts. HTML is the markup language that includes all of the text you have on the page. It also references all of the other assets you have, your images for example.

In order for the page to load and display on a user’s computer or phone, they have to transfer across their network connection, the HTML and all of the images. If you have large (file size) images it’s going to take longer for this to happen. Chances are, many visitors are not going to stick around if the page load speed is too slow. This is even more important for mobile users, typically the network speed is slower and so a page load can take even more time.

2) Impacts on your search engine visibility

Google has said for a while now, it’s actively places faster loading website above those that are slow in search results. Large images can have a real impact on how often your site is displayed on Google.

Check the file size of your images

When you upload your image into WordPress, you can see how big they are from the Media Library interface. Begin in the media library, click edit on any of your images.

Then next to the image you can view the file size.

Compressing images

When you’re preparing images for your website you can  compress them (making the file size smaller) before you upload them or after you upload them to WordPress. If you have a tool like Photoshop you can compress images using the ‘save for web‘ option. Using the quality slider shown here, you can view in real time what the image is going to look like, as well as the resulting file size.

If you don’t have tools on your computer to compress images you can opt to do it after you upload to WordPress. You’ll need access to a service like ShortPixel. This is a service that we use to help users manage images inside WordPress. It has to be installed into your site, once it’s available it can automatically compress images as you upload them. You can also retrospectively run the optimiser over parts or your whole media library to fix large images that have previously been uploaded.

We’ll be publishing a more detailed look at ShortPixel here on our site soon, keep a lookout for that.

Further Reading?

Keen to learn more about optimising your website for speed? Checkout our WordPress performance articles here. If you’re interested in SEO, we have a lot of content specifically for SEO within WordPress.

Say hello :)

We'd love to hear about your WordPress project! Whether it's a rebuild of an existing website, a brand new website or you're looking for a team of WordPress professionals to consult on your project, we're here to help.

dma-logo-icon
help-for-wp-logo-dma-2
© 2025 The Digital Marketing Agency
  • Plugins
  • Privacy
We are aware of a scam using our website on WhatsAPP
We do not hire via WhatsAPP Please ignore any approaches you might have.