How to write a blog post using WordPress Gutenberg
Gutenberg, the new WordPress editor is coming very soon. Follow along with this article for a step by step guide to publishing a blog post with the new editor.

There are plenty of articles out there giving you advice on how to write a basic in WordPress. Similarly, there are plenty of articles that provide explanation for how Gutenberg works and what some of the new and exciting features. Today we aim to combine the two in a continuation of our ongoing Gutenberg series, as we give you a step by step guide on how to write a basic blog post in Gutenberg.
Step 1: The Post Title
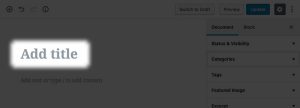
Setting the post title is an important part of writing any blog post, it’s the first thing a user reads when they arrive on the post, a poor post title can stop a user from reading your post before they even start! So it’s important to get this right. You can find the post title in pretty much exactly the same place in Gutenberg as you would be used to finding it in the classic editor. At the top of the page!
Step 2: Your first Paragraph
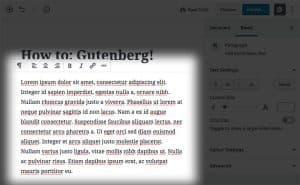
The opening paragraph of your article should be engaging and make your reader want to read the rest of the article. A good first paragraph is both engaging and informative, so it’s important to include a description of what the blog post’s content so that a reader knows what to expect.
Most readers will press on through difficult or complicated parts of your article if the opening paragraph described some information that they want to know later on in your post.
To actually add the text in Gutenberg, it’s as simple as a mouse click and being typing.
Step 3: Imagery

Imagery is one of the most important things in a blog post, (other than good content!) so it’s important to insert images throughout your article to illustrate your point. Working with images in Gutenberg is very straight forward.
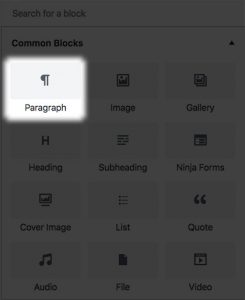
Insert an image block by clicking the plus button on the top left hand corner of the editor and select image. See the screenshot here.
If you need more guidance on how to insert blocks in Gutenberg, have a look at our introduction article: Getting to know Gutenberg.
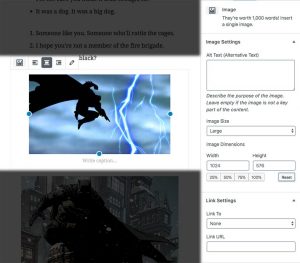
Previously with the classic WordPress editor, images were notoriously tricky to size, align and place. One of the improvements that Gutenberg brings is the way it handles images.
Once you’ve uploaded and selected the image for this image block you can very easily alter the exact position, size and alignment of the image.
Simply drag the blue dot toggles to resize the image!
Additionally, you can edit what the image links to when it’s clicked on, the alt text (the text that appears when you hover over an image), the exact dimensions and much much more!
Step 4: Further Paragraphs and Columns
Above we covered your first paragraph that is automatically added when you begin typing. However when it comes time to add more text to your article, you’re going to want to add additional paragraph blocks. You can do this by selecting the same plus symbol to add another block and then select Paragraph.
Something a little more fancy?
Columns are an exciting new feature that is brand new to the Gutenberg editor. Once you’ve inserted a column block, you can then add other blocks such as image or paragraph blocks within the columns. This will display two different blocks side by side allowing you to create much more interesting and varied layouts.
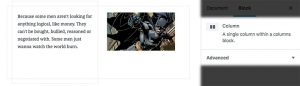
Columns can be as long or short as you like and can contain any any other Gutenberg blocks.
Images and other graphic blocks alongside some text work quite well in column format.
Step 5: Videos
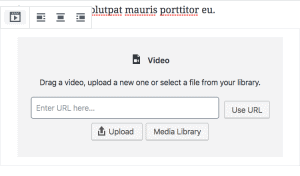
Depending on the nature of your article it might be good to upload a related video. Once again the new WordPress editor makes this easy to do. Add a video block and then insert your videos URL into the URL box. It supports all the leading video streaming services like Youtube, Vimeo and many others.
You can also, if you wish upload your video directly to the media library, although it’s generally better to upload your video to another service and then link it here instead to ensure it loads quickly.
Step 8: Forms
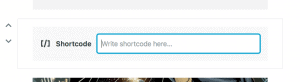 Sometimes you might like to add a form inside your content. It can be very engaging as it makes your article interactive and engaging. Forms can be used for many purposes, they can be quizzes on the content of your article or survey’s based on the topics discussed in your post.
They are a very versatile tool and are incredibly easy to embed into your post. We generally use the Gravity Forms Builder for WordPress. You can add a form by adding a short-code block and then inserting the short-code of the relevant Gravity Form.
Step 7: Post Meta
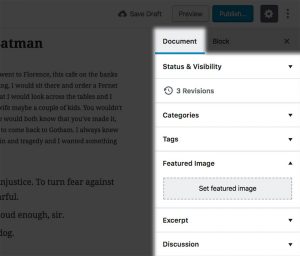
Now that you’ve completed your article, you can now decide on the category that your new post belongs in and set the featured image! The layout of these tools is a little different to what you are use to.
You can find the categories menu in the Document sidebar. In the right hand options menu, make sure that the Document tab has been selected. Then scroll down to the Category tab and open it up.
Chances are, if you’ve written articles before your site will already have a bunch of categories setup already, choose whichever is the most applicable simply by clicking on it.
To add a new category, simply click on the Add New Category button and enter the name of the new category you’d like to add. Additionally, if you’d like to nest this category under another one, (ie: create a sub category) simply select the “parent” category that is associated with the category you’re adding.
Lastly, we have the featured image! Featured images are the image that is displayed alongside the title of your blog post on Blog and News Archives. It’s important to pick an image that summarises your article well and will be interesting to readers.
You can set the featured image by opening the featured image tab and simply clicking on the Set featured image button.
Step 7: Publishing Controls
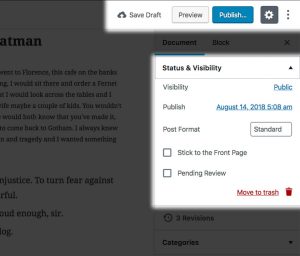 If you’re not ready to publish but want to save your work so that you can revise and publish it later, you can hit the Save Draft button. This saves it without publishing, making available to continue editing later.
When you’re ready to publish – hit the blue Publish button next to the Save Draft button.
Alternatively, if you’re ready to publish your post but wish to delay when it appears on your site, you can use the scheduling option. Set the exact date and time that your post will be published. WordPress will then automatically publish the article when the time comes.
Congratulations! You’ve written an article with the Gutenberg editor.
Reader Interactions