


Getting to know “Gutenberg”
the new WordPress editor
Say hello to Gutenberg!
This series is produced by The DMA, WordPress developers in Sydney.
Firstly, some background for those of you who may have no idea what Gutenberg is. It’s the new WordPress Editor which has been around in one form or another since mid 2017. It is planned to be released as part of WordPress 5.0, late in 2018.
The new Gutenberg editor is a major overhaul and combines the best features of the classic editor with some of the functionality found in modern page builders to create something completely unique and very exciting.
This guide is the first in a three part series. This first instalment is designed to bring you up to speed with the new Gutenberg editor. To teach you how to do the things you would regularly do with the classic editor. The second article will be aimed at exploring some of the new functionality that Gutenberg brings to the table and showing off what this new editor can do! Finally, the third and article will be touching on a few of Gutenberg’s more advanced features.
Section two and three will be published in September 2018, check back here for links to these two sections.
Getting Started With
Gutenberg
If you’re reading this before WordPress 5.0, congratulations! You’re ahead of the game, you will however need to install a plugin to get started with Gutenberg.
Head to the “Add New” menu under “Plugins” in your admin menu and on the homepage you should see the Gutenberg plugin pretty close to the top of the featured page.
If you’re reading this after the release of WordPress 5.0 also congratulations! You have to do absolutely nothing. Gutenberg is a part of WordPress core now and so is already automatically installed.
If your website is in a managed hosting environment with the DMA, chat to our support team and we’ll arrange for Gutenberg to be installed on your site for you!

Installing the Gutenberg Plugin

Gutenberg’s New Interface
When you create a new post or page or edit an exiting one, this is what the new Gutenberg interface will look like.


Gutenberg
Blocks
Now, it’s important to resist the urge to wish for the familiarity of the classic editor. All the features you know and love about classic are here in Gutenberg! They’ve just moved around a little!
Before we get into specifics, it’s a good idea to get comfortable with the idea of blocks. The new editor is build around them. Before, all the content that appears in a page or post is displayed in the one editor, content can now be separated into different blocks for convenience of layout.
For example, say you have two images and some paragraph content. In Gutenberg, each separate piece of content belongs in its own block. In the example opposite, we have an image block followed by a paragraph block and finally another image block.


Something old….
Something new
Now, lets go over the things that you’ve probably been doing for years
and how to handle them in Gutenberg.
Basic Block Control
Adding a new content block
To add a new block in Gutenberg you can use either click on the plus button (figure 1 below) at the top right hand corner of the screen, which will add a new block directly underneath your currently selected block or you can click on the plus button which appears when you hover over the first panel of the page.
Next select what type of block (figure 2 below) you’d like to be using. In this example we’ll be concentrating on the “Common Blocks” section as that covers the functionality that was available in the classic editor.

Figure 1: Adding a new content block in Gutenberg

Figure 2: Choosing a content block

Basic Block Control
Moving & Re-ordering Blocks
Changed your mind about the order of the blocks you’ve setup? Move blocks up and down by hovering over them and then selecting either the “Move Up” or “Move Down” controls on the far left hand side of the page.

Re-ordering Blocks
Basic Block Control
Block Settings
There are also a number of block settings which can be accessed by clicking on the “More Options” button, which looks like three vertical dots. This opens up a menu which gives you access to a number of extra controls. “Edit HTML” allows you to edit the currently selected block as HTML, similar to the “text” tab of the classic WordPress Editor. “Duplicate” duplicates the currently selected block. “Add to Reusable Blocks” adds the currently selected block to a list of reusable blocks, which is a feature we will talk more about later in the guide. Finally, “Remove Block” does what it says on the tin, removes the currently selected block.

Gutenberg Block Settings

Power Tip!
Something worth noting is that while a toolbar does appear above the selected block for you to make changes, there are more options to be found to the right hand side in the options menu in the “Block” tab. If at any time you’re trying to find a particular setting and you can’t seem to find it in the toolbar, try the options menu to the right.

Look for additional options here

Gutenberg Blocks
Start Discovering!
Different types of content have their own block types,
let’s have a quick overview of the basics.
Block Types
The Post Title
Let’s start with the post title, which can still be found in pretty much the same place. You can find the post title at the very top of the page, simply click on the placeholder text “Add Title” and start typing to set your post title. The two screenshots below show the old versus the new method.

Editing the post title in the classic editor

Editing the post title in the Gutenberg

Block Types
Headings
Next we have headings, in the classic WordPress Editor you’d find find this setting as a dropdown at the top left hand side of the editor.
In Gutenberg (see figures below), you simply add a heading block to your post or page. You can change the heading type, from a heading 1 through 6 and all the other standard text formatting and alignment options.

Headings in the WordPress classic editor

Start by choosing the Heading Block

…then type in your heading


Block Types
Paragraphs
Now for paragraphs, in the classic editor, you would simply type out your text into the editor and hit return for each new paragraph. In Gutenberg, it is equally as easy! Simply select a paragraph block and start typing!
There are some new additions to standard paragraph text in Gutenberg. In the toolbar above the block, you have all the standard formatting options. In the options menu to the right you can control the size of text, either selecting a from pre-set standard text size sizes or entering your own custom size.
Gutenberg also includes an interesting new feature called “Drop Cap” which you can see in our example below. It automatically enlarges the first character of your paragraph. Just below “Drop Cap” there are also options to select a colour from a list of options or to set a hex colour for your text.

Choose the paragraph block…

…the start typing!

Block Types
Lists
With Gutenberg, lists could not be any easier. In the classic editor, the text to be changed to a list had to be selected and then the list item had to be selected and transformed into a list.
Now in Gutenberg, you simply add a list block (see below) and start typing! Push return at the end of each list item.

Working with lists in the classic editor

Start by selecting the list block

Enter your text to create a list


Block Types
Images
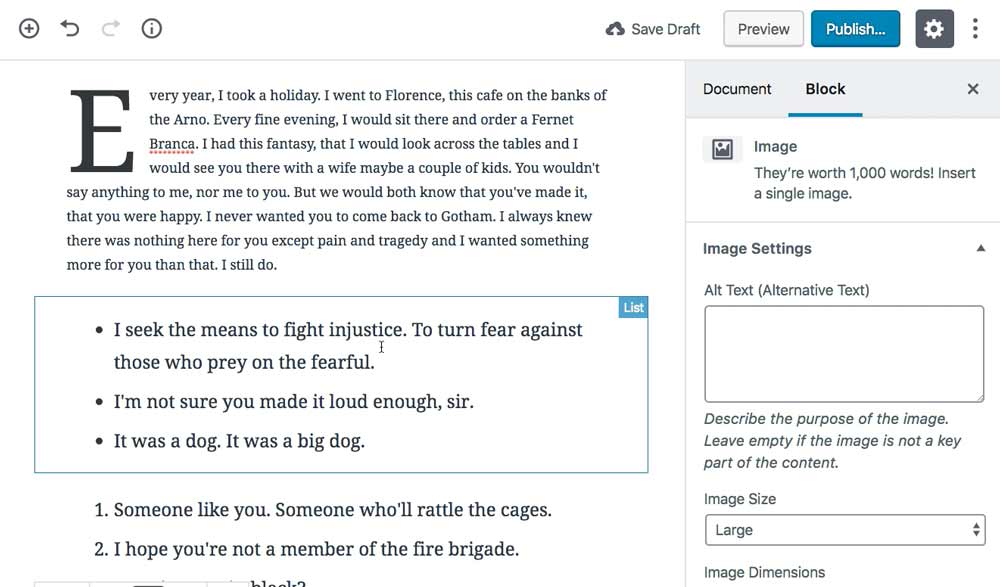
Next we have images, which have really been improved by Gutenberg. Create an image block and you can customise the image many different ways.
There are controls on the right hand side where you can manually resize the image by it’s dimensions and reset the image if you mess it up.
Additionally, there are blue toggles on the actual image itself which can be used to resize the image visually. Finally, there are link settings where you can change where and if the image has a link associated with it.

Resizing images in Gutenberg

Inserting an image in Gutenberg, start with an image block

Image settings in Gutenberg

Block Types
Image Galleries
Very similar to the image block, we have the gallery block.
Default WordPress galleries have been quite cumbersome in the past. Chances are that on your current site you use some kind of custom gallery plugin to create galleries. With Gutenberg, you can create fantastic responsive galleries all from within the editor.
On the toolbar above a gallery block you have the option to align the gallery and in the left hand options menu. There is the option to change the number of columns in your gallery. There are radio buttons which define whether or not the image should be cropped. If you select for your images to be cropped, Gutenberg will make the images the correct size so that they fit into the gallery properly. If you decide that you’d prefer for the entire image to be displayed, you can turn this option off.
Finally the option for what, if anything you’d like the gallery items to be linked to.

Working with galleries in Gutenberg

Block Types
Shortcodes
Shortcodes have always been a tad confusing to deal with for your average user as their output can only be seen on the front end. Gutenberg has attempted to simplify the way shortcodes are used in WordPress by giving them their own block!
Simply navigate to the “Widgets tab” of the blocks menu or search for “Shortcode” and drop the shortcode into the block.

Adding a shortcode is done by using the shortcode block

Editing a shortcode in the block


Block Types
The classic editor
Finally, if you truly cannot get used to using Gutenberg blocks or would like a bit of familiarity on your dashboard you can use the classic editor block.
Navigate to the “Formatting” tab or search for “Classic” in the blocks menu and select the classic editor, you can use the classic WordPress wysiwyg editor as a block.

The classic editor is available as a block
Post Settings
Saving and Publishing
Once you’ve completed your editing,
here’s how to save drafts and publish in Gutenberg
The final part of this guide is to briefly explain where your post settings have gone. In a word, nowhere! They are still in the sidebar, you just have to make sure that you are on the “Document” Tab.
Additionally you can find the Publish settings have now been split up, separated into two places. You can now publish, preview and save a draft of your post all from the header bar at the top of the interface. Change settings like the visibility, publish date and format settings from the “Status & Visibility” drop down in the options menu sidebar.

In the Document tab you’ll find familiar options to set categories, excepts etc..

Done? Look for publish and save controls here!

We hope that you’ve this guide useful, be sure to check out the rest of the series as it is published!
Happy Editing with WordPress!